How to Create an Online Store in India Without Coding
Create an online store in India without coding: products, UPI and Razorpay payments, shipping, GST and launching — a practical guide for small sellers.
S
Srijan
Founder, Opmiz
You run a clothing shop in Patna. Or maybe you sell handmade candles from home in Jaipur. Customers like your products, and you're thinking about selling beyond your neighbourhood. But building a website sounds expensive and technical.
It doesn't have to be.
Today, you can create an online store, add products, accept UPI payments and manage orders without writing code or hiring a developer.
In this guide, we'll walk through setting up your own store using Opmiz, from choosing products to accepting your first order. We'll also cover the costs, GST requirements and practical decisions that come with selling online in India.
Decide What You Want to Sell
Start with your products, not your website design.
Think about what you're selling, who will buy it and where you're willing to deliver. A clothing boutique in Ranchi has different requirements from someone selling homemade pickles in Lucknow.
Begin with a manageable catalogue. Five to twenty products are enough for your first store. For each product, prepare:
- Name and price: what the customer will see and pay.
- Photographs: two or three clear pictures showing different angles.
- Description: size, material, ingredients or other useful details.
- Stock: how many units you have available.
- Variations: different sizes, colours or options, if applicable.
- Weight and dimensions: useful for calculating courier charges.
For example, a homemade candle business could begin with five fragrances, each available in two sizes.
Starting in Opmiz
When you create your website in Opmiz, describe your business and the products you sell. The AI creates a first draft of your website and starter catalogue, which you can replace with your actual product information.
This means you can begin organising your store before every photograph and description is ready.
▶Tutorial: Create your website from one sentenceCreate Your Online Store with AI
A few years ago, building an ecommerce website meant choosing a template, configuring several tools or hiring someone to develop it. Opmiz takes a different approach.
You describe your business in ordinary language, and its AI generates the first version of your website, including page layouts, content and a starting product catalogue. For example, imagine you're opening a handmade home décor business in Jaipur. You could enter:
Opmiz creates an initial website that you can then edit. You can change the colours, replace photographs, rearrange sections and add products without touching code.
Your pages, blog, product catalogue, payments, orders and GST invoicing can all be managed from one place.
You can also manage your website with AI later
The AI isn't limited to creating the first version. Opmiz supports MCP, which lets you connect an AI assistant such as Claude to your website. You can ask it to add a page, publish a blog article, update a product or change the design.
The assistant works with your connected Opmiz site, subject to the permissions you give it, and you still review what it creates. This is useful when you want to update your website regularly but don't want to learn every part of the editor.
▶Tutorial: Run your business from Claude or ChatGPTReady to try it with your own products?14 days free · no credit card required
Start free for 14 daysGive Your Store a Professional Identity
Your website should look like your business, not a generic template. Start with your business name, logo, contact details and a few colours that suit your products.
If you run a traditional clothing shop, for instance, photographs of your actual garments matter much more than elaborate animations.
Choose a domain name
Your domain is your website address, such as yourbrand.in or yourbrand.com. A .in domain is a natural choice for an India-focused business. A .com is also suitable, particularly if you plan to sell internationally. Choose a short name that people can remember and type easily.
Create the essential pages
At a minimum, your store should include a homepage, product catalogue, About Us page, Contact page, and policies covering privacy, delivery, cancellations and returns.
On your About Us page, explain who runs the business and where it is based. A real address and a working support email help customers know who they are buying from.
Doing this in Opmiz
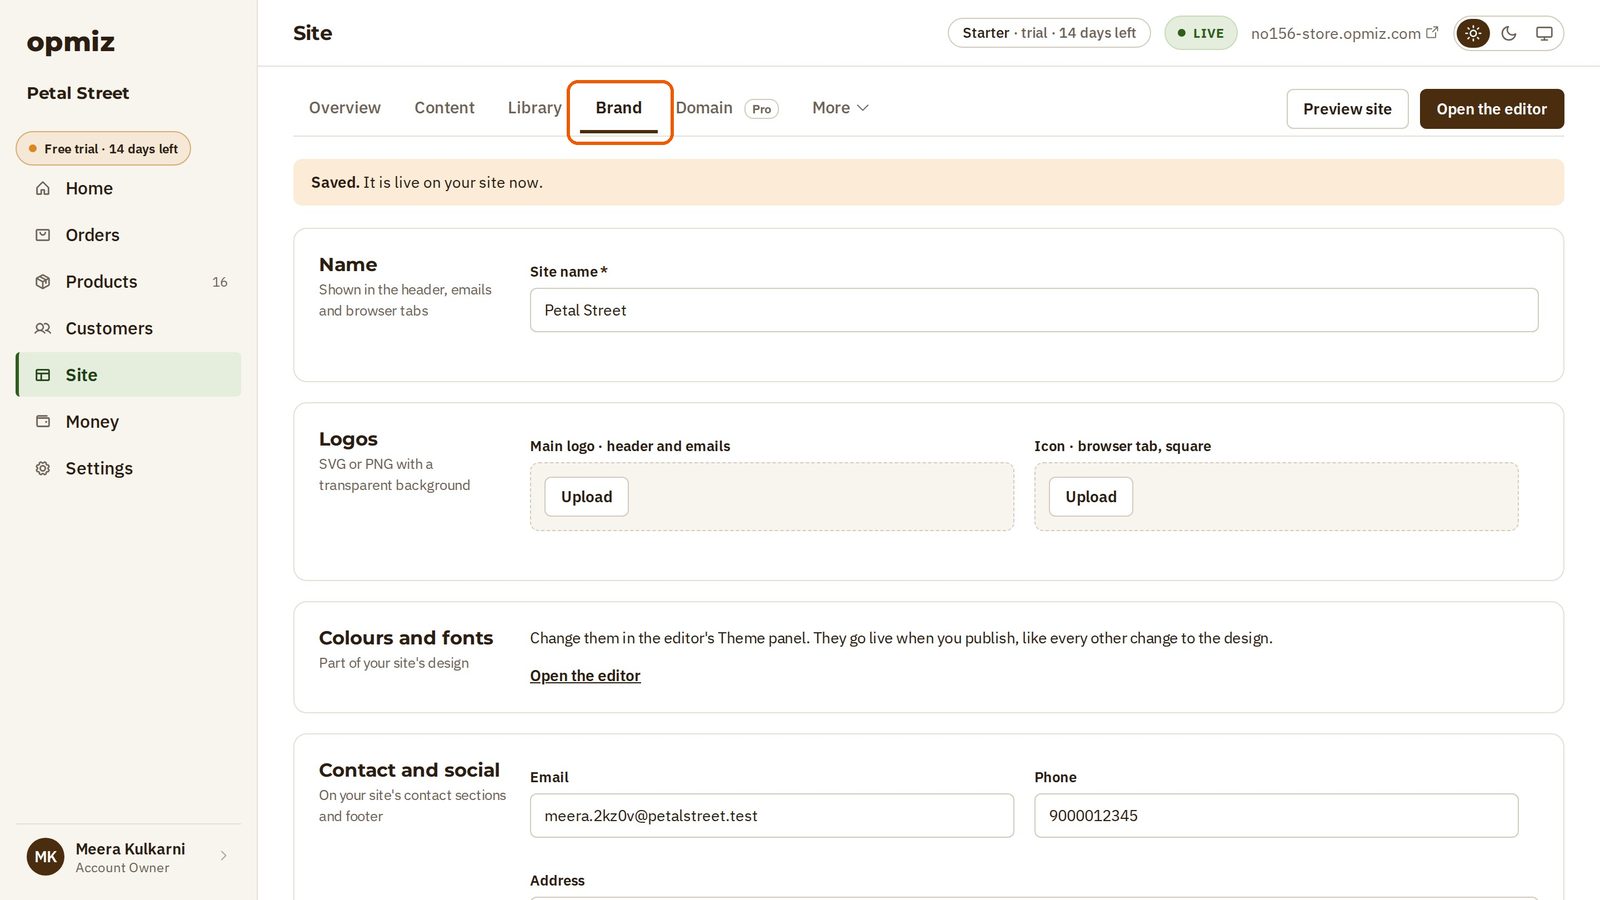
Open Site → Brand to add your logo, browser icon, business name and contact details. Use the website builder to edit your homepage and add pages to the menu. When you're ready, connect your own domain through the site's domain settings, subject to your plan.
Add Products That Customers Will Want to Buy
Your product pages are your online salespeople. When someone visits a physical shop, they can touch a product and ask questions. Online, your photographs and descriptions need to answer those questions.
Take clear photographs
You can begin with a smartphone. Place your product near a window, use a clean background and take pictures from different angles. Show important details such as fabric texture, stitching or packaging. For a cushion cover, include a photograph that shows its actual size on a sofa.
Write useful descriptions
The second description tells customers what they're buying and helps prevent avoidable returns.
Doing this in Opmiz
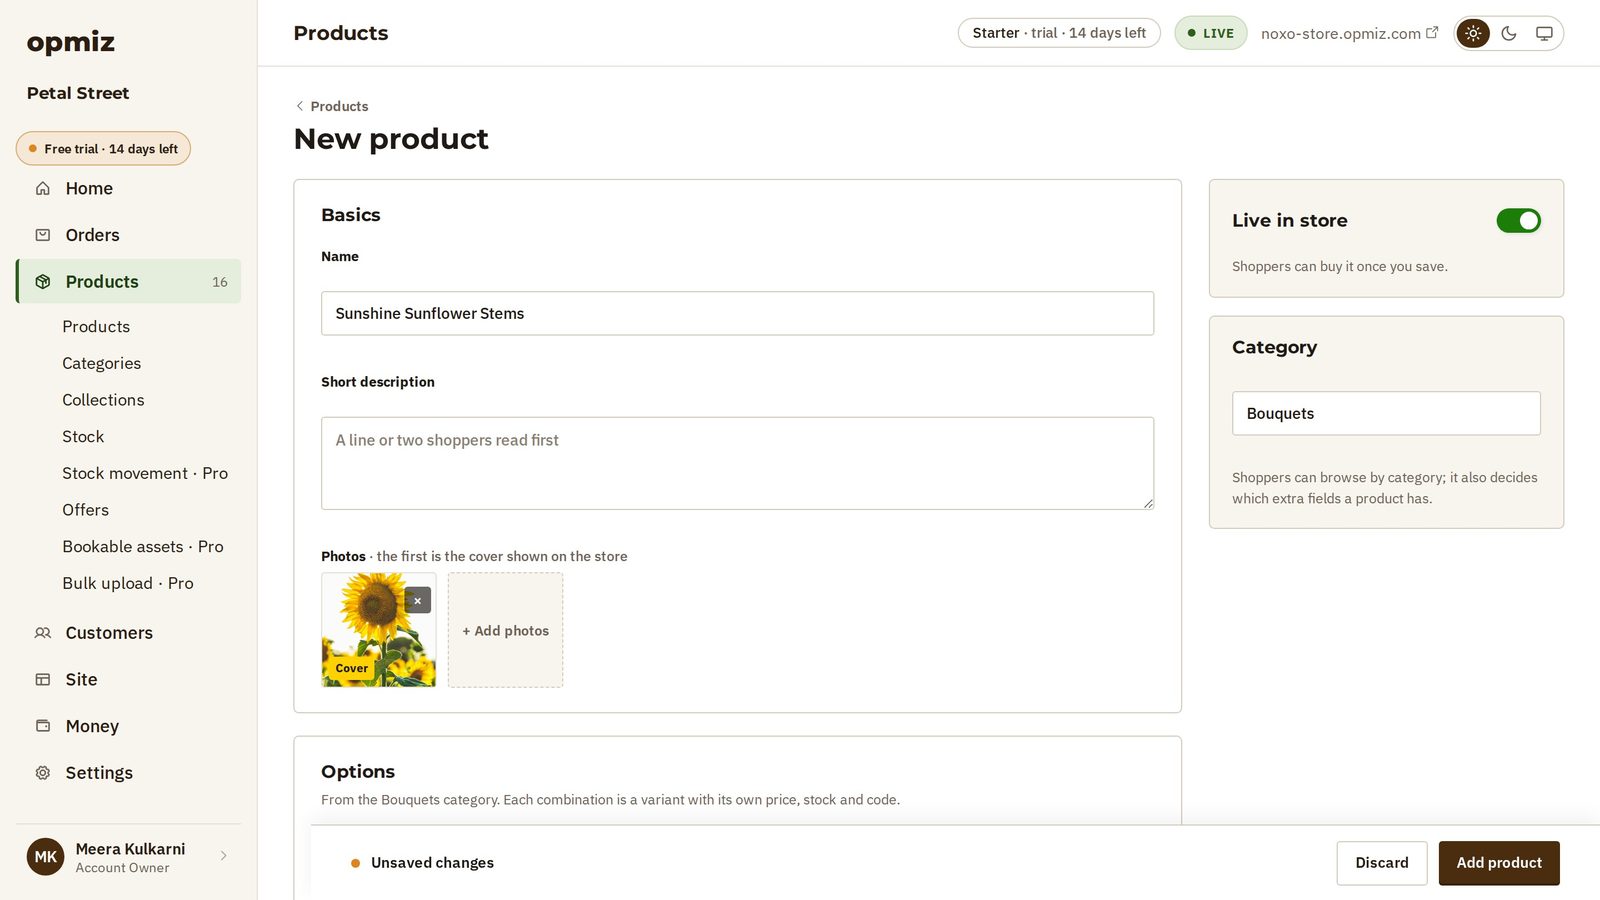
Open Products → Add product. Enter the product name, category, selling price, stock quantity, photographs and description. You can also configure variations such as size or colour and use Opmiz to keep track of available stock.
Set Up UPI and Online Payments
Indian customers expect familiar ways to pay, especially UPI. Your store should make payment straightforward rather than requiring customers to contact you separately to complete an order.
Opmiz supports several payment gateways:
- Razorpay, PhonePe and PayU for Indian payments.
- Stripe and PayPal for businesses accepting eligible international payments.
Available payment methods depend on the gateway and your merchant account, and may include UPI, debit and credit cards, netbanking and wallets. You don't need to connect all five. Choose the provider that suits your business, compare its fees and complete its account verification.
What will the gateway charge?
The standard rate at the main Indian gateways is about 2% per successful domestic payment, plus 18% GST on that fee — roughly 2.36% in total. On a ₹1,000 order, that's about ₹23.60.
This usually applies to UPI too. UPI itself has no bank charge, but the gateway still charges its platform fee. Some gateways run introductory offers, such as a 0% fee for the first few months, so check the current terms when you sign up.
Doing this in Opmiz
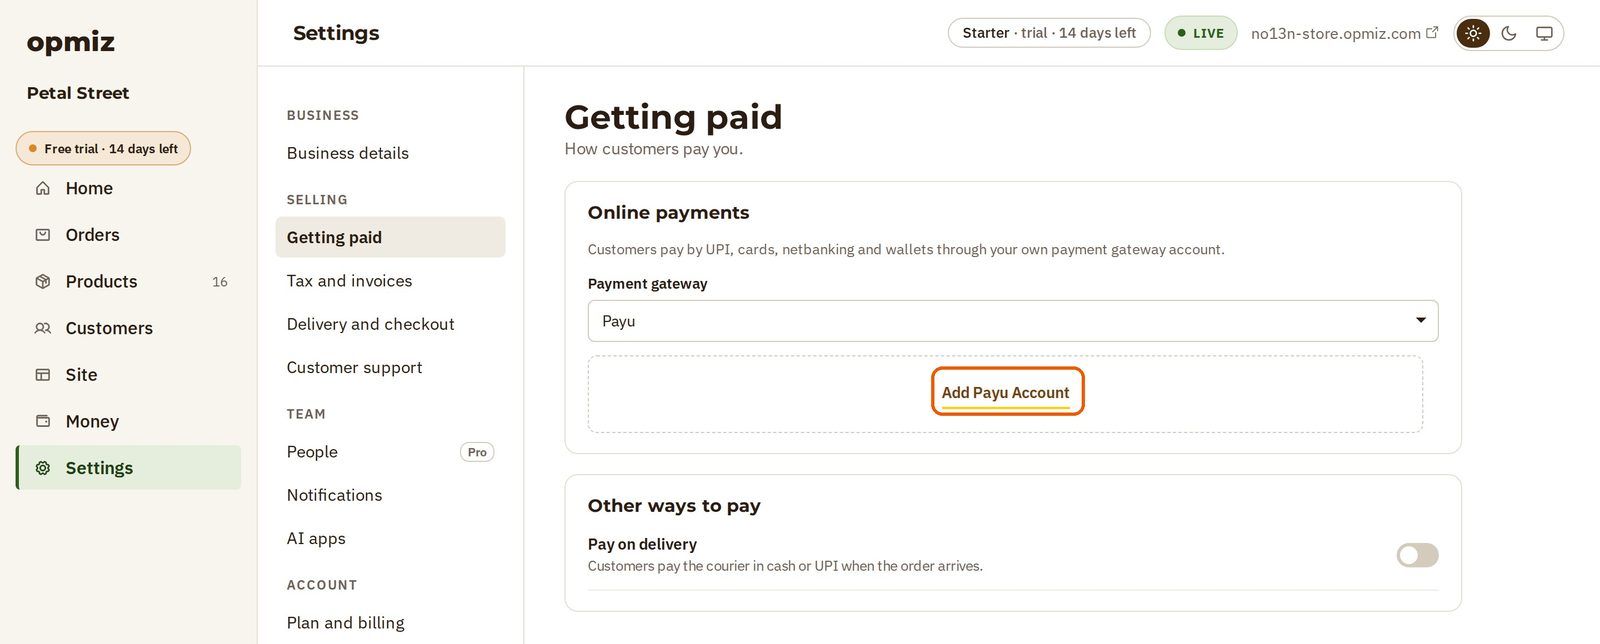
Open Settings → Getting paid and select your preferred payment gateway. Connect your merchant account using the details provided by that gateway. Once it's approved and configured, test the checkout with a small payment and confirm that the paid order appears correctly in Opmiz.
Set Up Shipping and Delivery
Before accepting orders, decide where you can deliver and how much you'll charge. If you're selling flowers in Pune, you may only want local deliveries. If you're selling clothing from Patna, you may want to ship across India.
For physical products, compare courier services by delivery PIN code, parcel weight, pickup availability and return charges. Couriers charge by the higher of actual weight and size-based (volumetric) weight, so a light but bulky box can cost more than you expect.
Decide your shipping charges
You could charge:
- A fixed ₹80 delivery fee.
- Free delivery above ₹999.
- Different charges for local and national deliveries.
These are examples, not recommended rates for every business. Remember to include packaging when calculating your profit. A product that sells for ₹499 may leave little margin after courier charges, packaging and payment fees.
Cash on Delivery can attract customers, but refused deliveries and return-to-origin shipments can be expensive.
Doing this in Opmiz
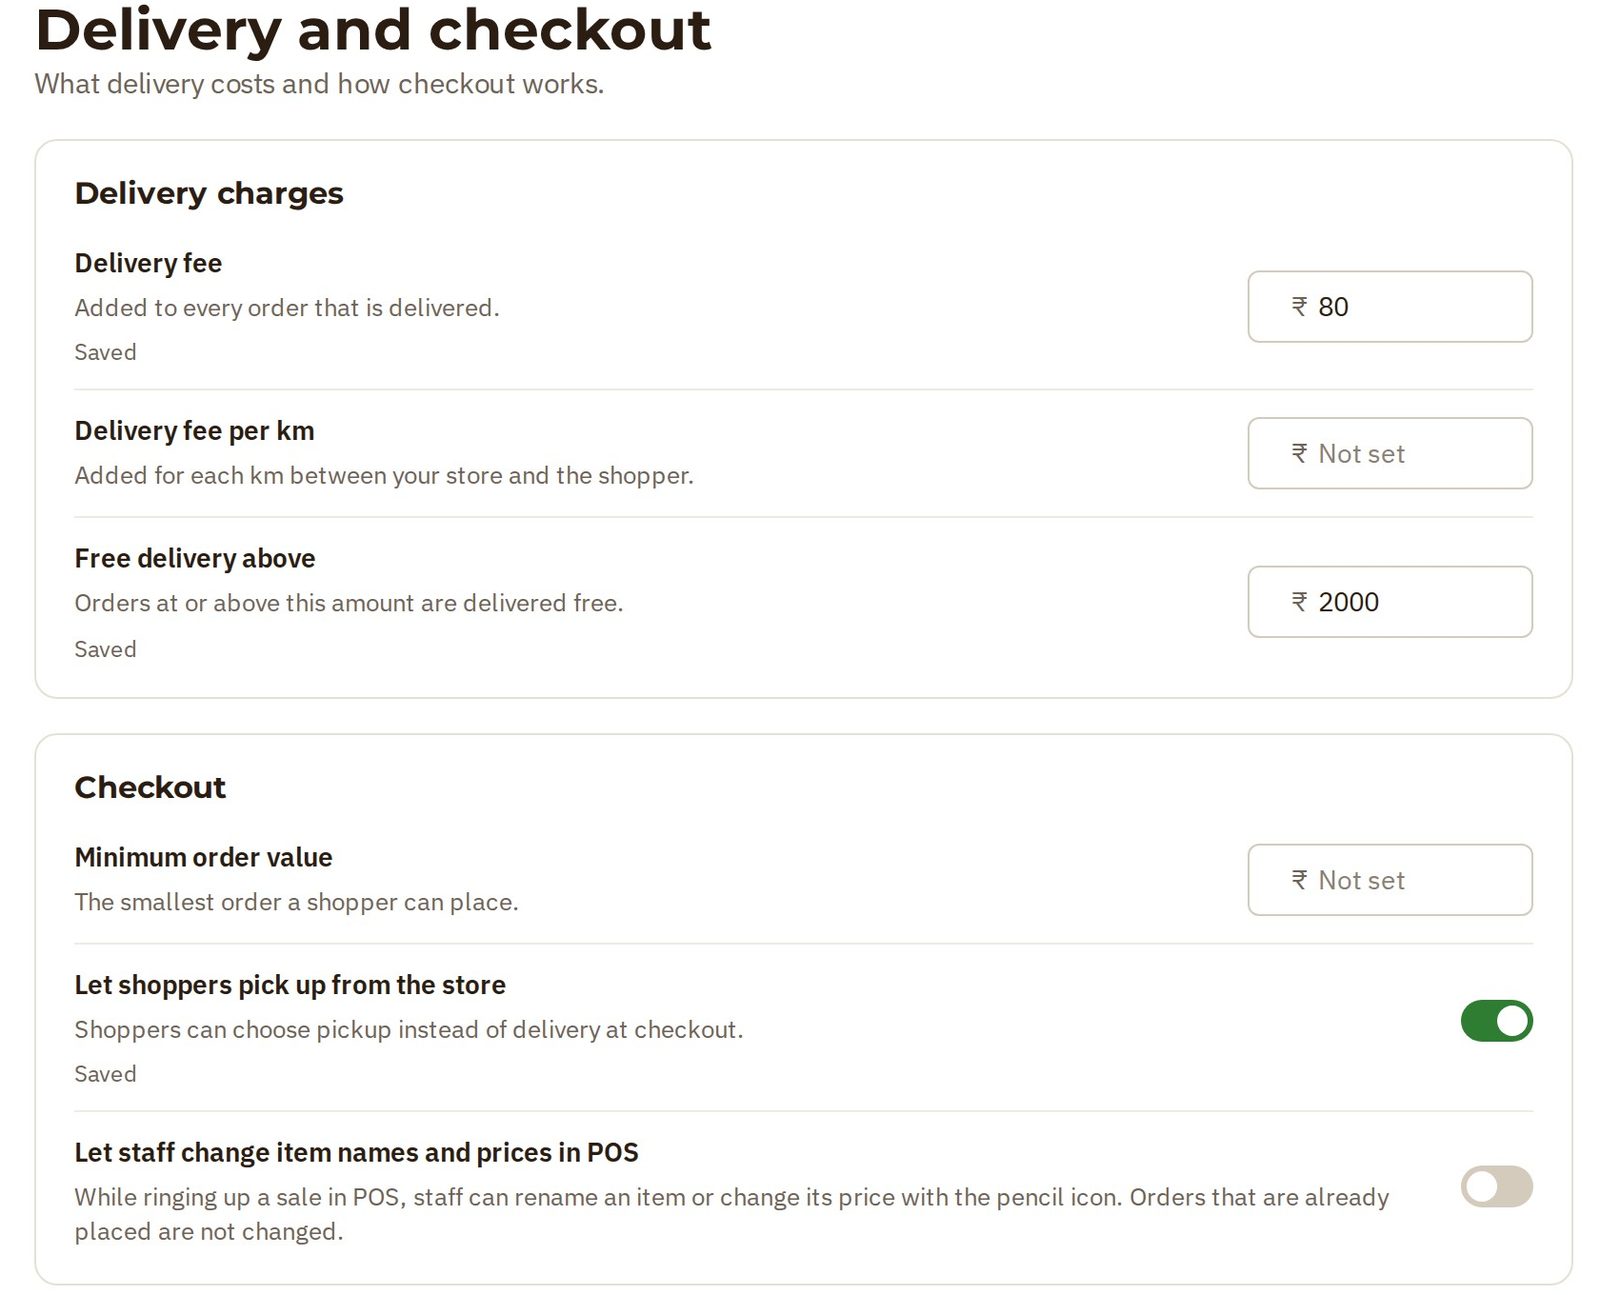
Open Settings → Delivery and checkout to configure delivery charges, free-delivery thresholds and customer pickup. These delivery-fee controls are available on the Pro plan. You can also configure Pay on Delivery separately. Courier booking and delivery still need to be arranged with your chosen logistics provider.
Prefer someone to help you set everything up?
Opmiz is offering free store setup help on a call with the Opmiz team. Get guidance on your website, products, payments and domain. No plan purchase is required.
Book your free setup callUnderstand GST and Legal Requirements
This is one part of selling online that's worth getting right before your first order. Whether you need GST registration depends on what you sell, where you deliver and whether you sell through your own website or a marketplace.
The general turnover thresholds
| If you supply… | Most states | Some special-category states |
|---|---|---|
| Only goods | ₹40 lakh | ₹20 lakh |
| Services, or goods and services together | ₹20 lakh | ₹10 lakh |
Annual aggregate turnover. The lower limits apply in some North-Eastern and hill states; check the limit for your state.
If you sell goods and also charge for a service, such as stitching or customisation, the lower services threshold may apply to you.
If you ship goods from your state to a customer in another state — say, from Patna to Delhi — that is an inter-state supply. GST law requires registration for this whatever your turnover, so the ₹40 lakh limit doesn't help you. If you plan to deliver across India, get your GSTIN before you start taking those orders.
Your own website vs Amazon or Flipkart
When you sell your own products through your own website, there is no Tax Collected at Source (TCS) on those sales. Your normal GST obligations still apply once you're registered.
Marketplaces such as Amazon and Flipkart collect TCS at 0.5% of the net value of your sales (down from 1% since July 2024), and normally require you to be GST-registered from the first sale.
There is one exception for small marketplace sellers of goods: you can sell without GST registration if your turnover is within the threshold, you sell only within your own state, and you've taken an enrolment number on the GST portal using your PAN. This applies to marketplaces only, not to your own website.
Selling through your own store doesn't make your business GST-exempt. Because these rules have exceptions, talk to a Chartered Accountant before you start, especially if you'll deliver across state borders.
Official reference: CBIC GST FAQs.
Doing this in Opmiz
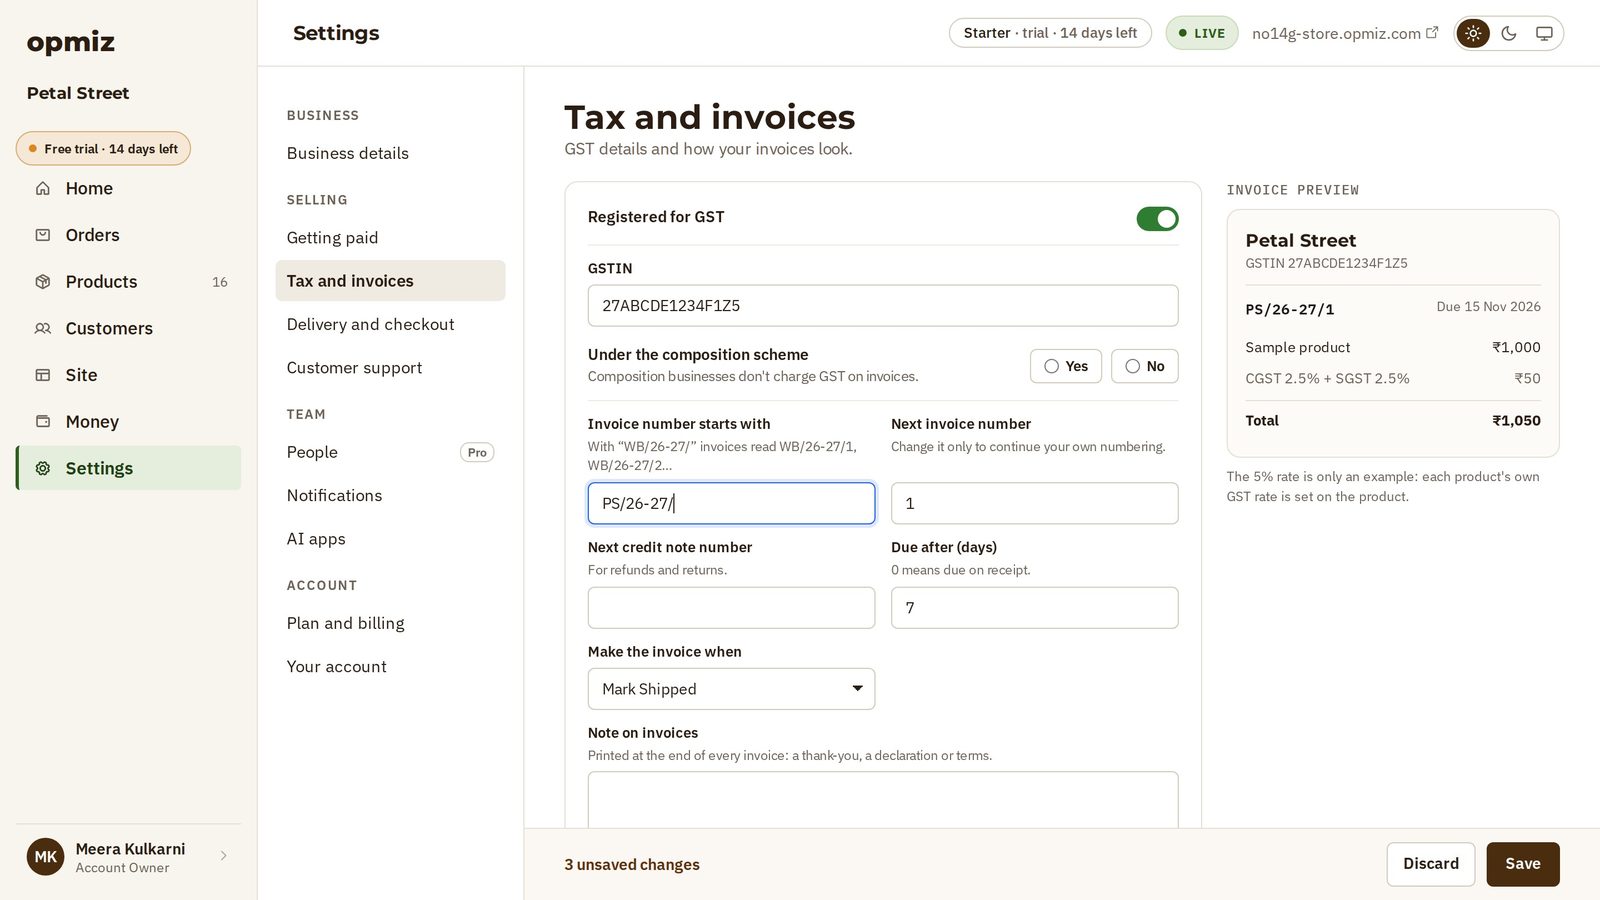
Open Settings → Business details to enter your legal business information. Under Tax and invoices, specify whether your business is GST-registered, enter your GSTIN if applicable and configure invoice details. Opmiz then generates invoices using your product tax rates and business information.
Test Your Store Before Publishing
Before sharing your store with customers, place an order yourself. Try it on a mobile phone. Most importantly, check whether a customer can understand what you're selling and complete checkout without getting stuck.
- ☐Every product has the correct price and photographs.
- ☐Stock quantities are accurate.
- ☐Product pages work on mobile.
- ☐The cart and checkout work.
- ☐UPI or card payments have been tested.
- ☐Shipping charges appear correctly.
- ☐Order confirmation works.
- ☐Contact and return information is visible.
- ☐GST and invoice settings are correct for your business.
Ask a friend to try the store without explaining how it works. If they struggle to find the delivery charge or complete a payment, fix that before advertising.
Doing this in Opmiz
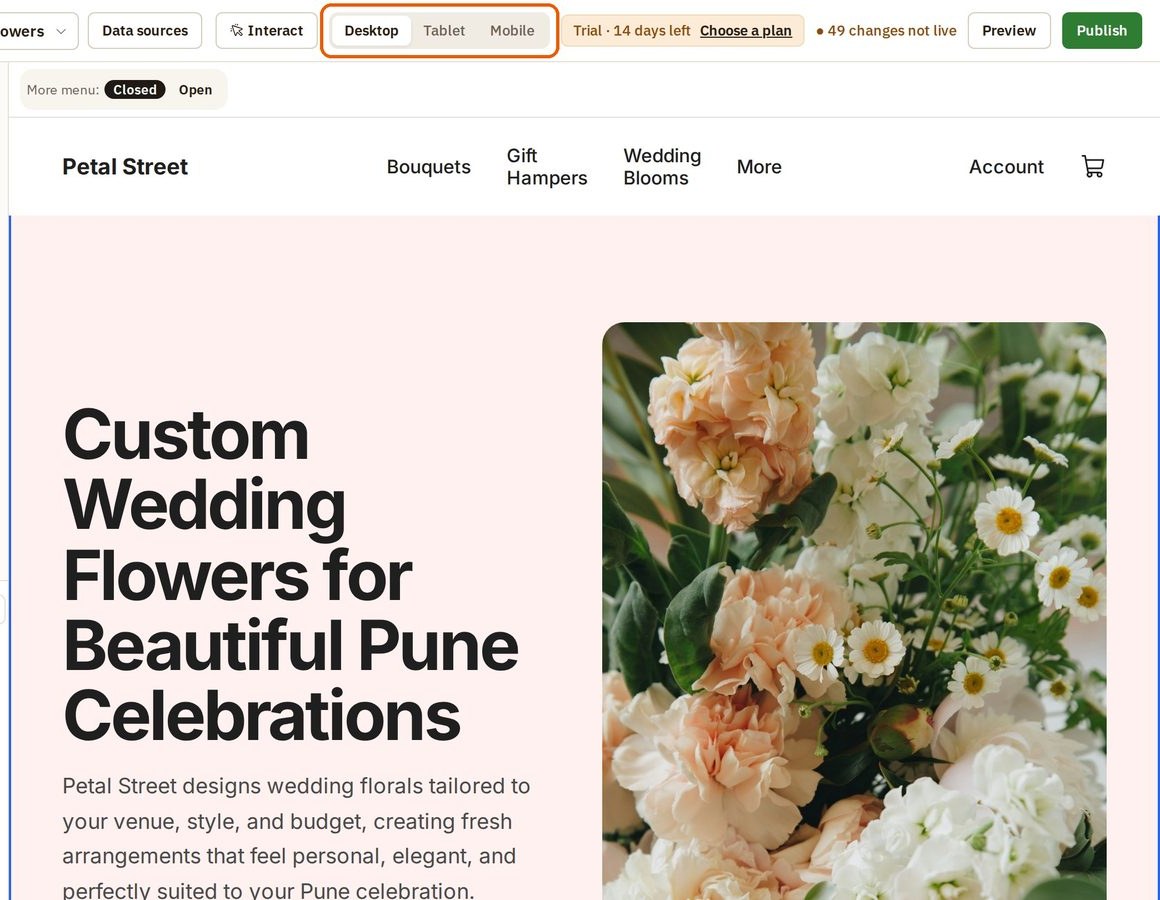
In the website builder, switch between Desktop, Tablet and Mobile previews to inspect your layout. When you're ready, use Publish and complete the required contact, legal and policy checks. Your store then goes live on its Opmiz-hosted address.
Get Your First Customers
Your website is live. Now people need to discover it, and you don't need a large advertising budget to begin.
Start with existing customers
If you have a physical shop, give interested customers your website address. Print it on your invoices, put a QR code near your counter and add it to your business's social profiles. Someone who already buys from you may be your easiest first online customer.
Show products being used
A clothing shop could share outfit combinations. A home décor business could show how a table runner looks in an actual dining room. Link people directly to the product rather than sending everyone to the homepage.
Get found on Google
Use descriptive product names and page titles. "Handwoven Cotton Cushion Covers" tells Google and customers more than "Premium Product 001". You can also publish useful articles answering questions your customers search for.
Doing this in Opmiz
Use the Opmiz blog to publish guides and product-related content alongside your store. You can also create discount codes for specific campaigns. Track your orders and learn which products customers actually buy before spending heavily on ads.
▶Tutorial: Write and publish a blog postHow Much Does It Cost to Start an Online Store in India?
The website is only part of the cost. Packaging, courier charges, photography and payment fees also affect your budget. Here is a practical estimate for a small Indian seller.
| Expense | Typical cost in India |
|---|---|
| Website platform | Opmiz from ₹1,000/month, before 18% GST |
.in domain | ₹200–₹600 first year on offers; renews at about ₹900–₹1,000/year |
.com domain | Often under ₹700 first year on offers (some need a multi-year term); renews at about ₹1,300–₹1,600/year + GST |
| Payment gateway | About 2% + GST on the fee (≈2.36%) per online payment, including UPI; some offer 0% introductory periods |
| Packaging | ₹10–₹50 per order (estimate) |
| Courier — local, up to 500 g | ₹25–₹50 per shipment, plus GST |
| Courier — national, up to 500 g | ₹50–₹150 per shipment, plus GST and any COD charge |
| Photography — DIY | ₹0 with a phone and a window |
| Photography — hired | ₹50–₹500 per image for basic studio shots; ₹1,500+ per image for styled or lifestyle shots |
| Typical first-month total | ≈ ₹2,000–₹4,100 |
Approximate, as of November 2026. Prices vary by supplier, city, order volume and offers. The first-month total assumes an Opmiz Starter plan (before GST), one .in domain bought at the start, phone photographs and about 10 orders of around ₹800 each, shipped as small parcels. It excludes stock, advertising, GST registration or CA fees.
Your actual spending depends on how many orders you receive. Courier, packaging and payment charges grow with sales, so include them in every product's selling price.
Opmiz offers 14 days free, no credit card required. After the trial, paid plans start at ₹1,000/month before 18% GST. You can compare plans on the Opmiz pricing page.
Frequently Asked Questions
Can I create an online store without knowing HTML or programming?
Yes. Opmiz lets you generate a first website from a short business description and then edit its pages visually. Product management, orders and supported payment integrations are available without writing code.
Can I start an online store from home?
Yes. You can manage products, stock and orders from home using Opmiz. You'll still need to arrange packaging, shipping and any registrations or licences your business requires.
Is it better to sell on Instagram or have my own website?
Both can work together. Social media helps people discover your products, while your Opmiz store gives them a dedicated place to view prices, browse products and place orders.
Can customers pay using UPI?
Yes, through a supported payment gateway with UPI enabled. Connect your gateway account in Settings → Getting paid and test a payment before accepting orders. Most gateways charge their standard fee on UPI payments too.
Do I need GST registration to sell online?
If you sell only within your own state and stay under the turnover threshold, usually not. If you ship goods to customers in other states, you generally need to register from your first such sale. Confirm your case with a Chartered Accountant.
Can I create an online store for free?
Opmiz offers 14 days free, no credit card required, so you can create and try your store before choosing a paid plan. Paid plans start at ₹1,000/month before 18% GST, with other operating costs depending on your business.
How long does it take to create an online store?
Opmiz can generate the first draft of your website in minutes. Adding your real products, configuring payments, completing business details and testing orders takes longer, depending on how prepared you are.
Which payment gateways work with Opmiz?
Opmiz supports Razorpay, PhonePe and PayU, along with Stripe and PayPal for eligible international payments. You choose and connect a provider; its payment methods and charges depend on your account.
Can someone help me set up my store?
Yes. For a limited time, the Opmiz team offers free setup help on a call, with no plan purchase required. Book it on the free setup page or write to support@opmiz.com.
Your First Store Doesn't Need to Be Complicated
Start with a small selection of products. Add clear photographs and accurate prices. Set up payments, decide how you'll deliver, and place a test order before inviting customers.
As orders arrive, you'll learn which products sell, what customers ask and where your store needs improvement.
More than 1,500 shops have been built on Opmiz. You can create yours with the visual builder, then keep managing it yourself or ask an AI assistant such as Claude to help with updates through Opmiz MCP.
Build it yourself
Generate your website with AI, add your products and explore Opmiz.
Start free for 14 days No credit card required.Get help setting it up
Speak with the Opmiz team and get your store set up with you on a call.
Book a free setup call No plan purchase required.Srijan is the founder of Opmiz. More about Opmiz
AI websites with native commerce. Pages, blog, store, payments and GST invoices in one place, built from a short description.
Start free for 14 days →© 2026 Opmiz · WriterBabu Online Services Private Limited. All rights reserved.
Prices in INR, before 18% GST · Made in Patna, India